Journeys Are My Diary

Life, Adventures, Entertainment and more - A little bit of everything blog!

  • Home
  • Contact & PR
  • About Me

Simple Tips For Making Your Bathroom Look More Expensive

April 24, 2017 by Bel

After the kitchen, the bathroom is probably the most expensive room in the home to fix up. A quick look online will show you exactly how much some people pay for their bathrooms, Are you in a budget and is looking to have small bathroom renovations? Then you must find a bathroom remodeling services company that can help you with lots of bathroom ideas such has lighting, color, height, reflectivity and many more.

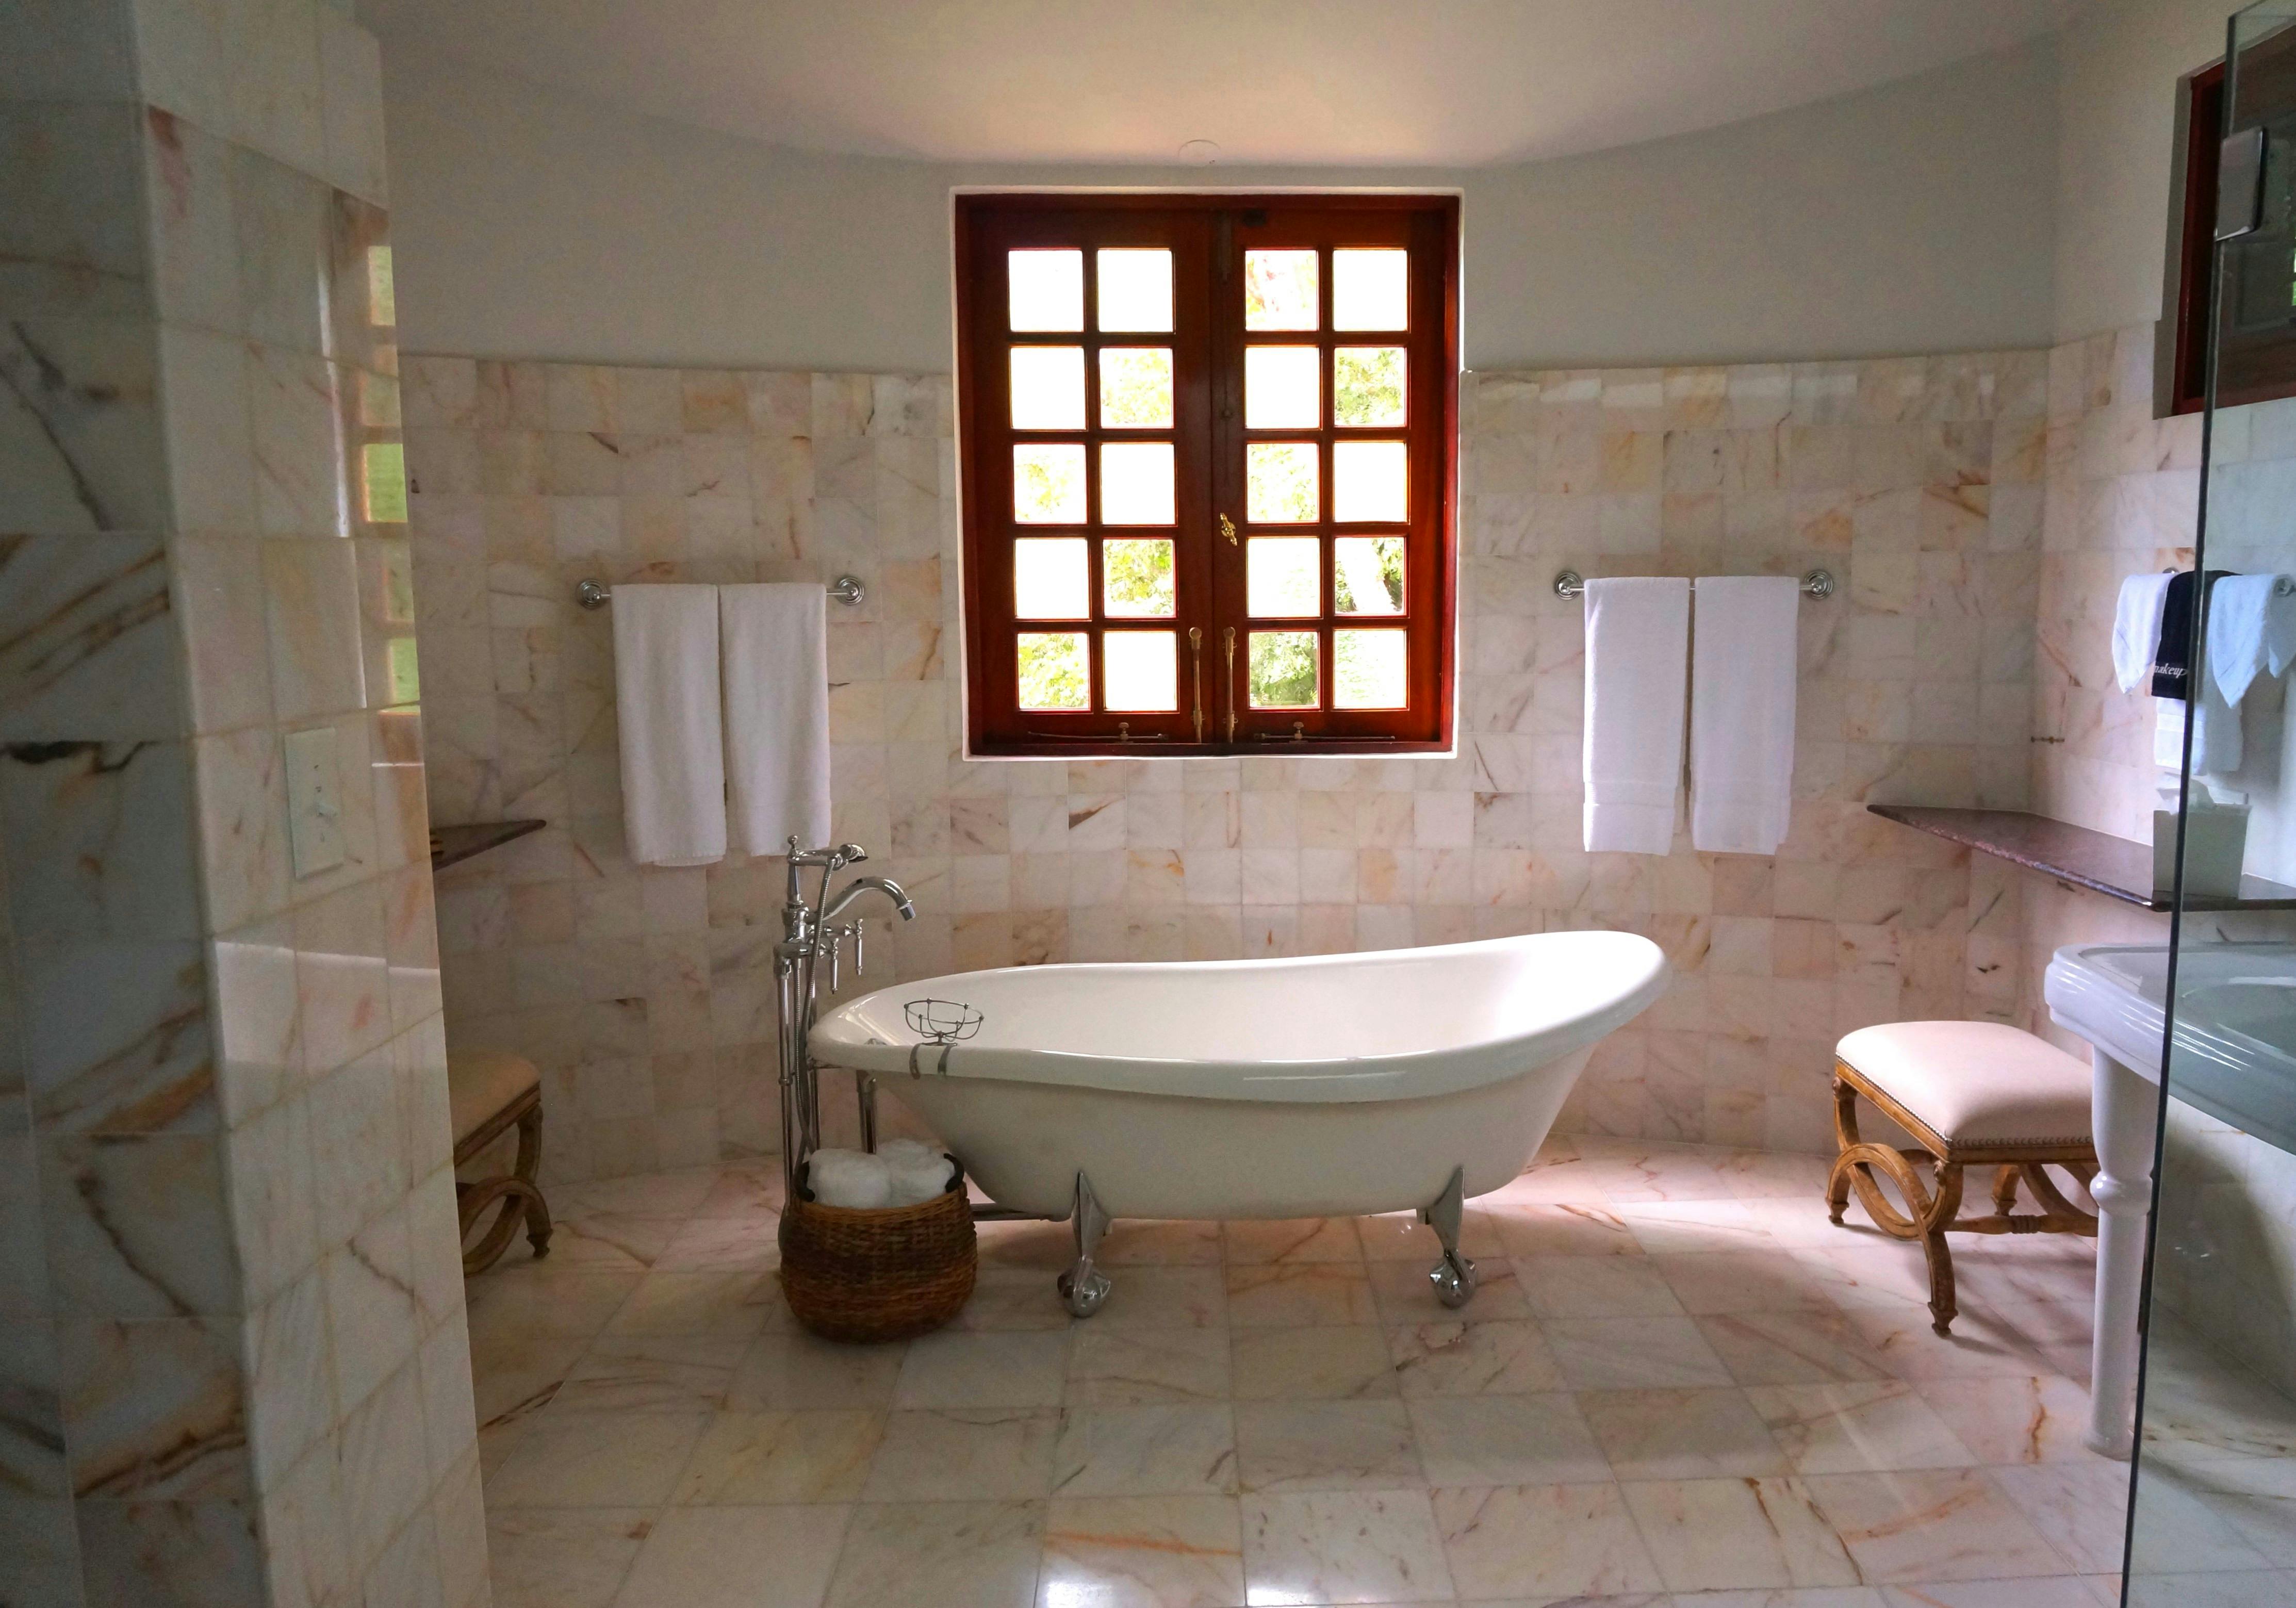
But the honest truth is that you don’t need to splash out on a rain shower to make your bathroom look the part, with a frameless shower door or any of those high quality shower doors you will notice the difference. Look for some shell stone tile or marble flooring to have an stylish bathroom floor. If your renovation would affect the bathroom’s plumbing system, make sure to hire a plumbing services company to help make the necessary adjustments.

Take our bathroom, as the perfect example – it looked awful when we moved in, but I think we managed to do a pretty good job in the end. We also consider using an odor eliminator like toilet drops that has a clean, refreshing scents. With creative bathroom remodeling ideas– and a lot of hard work – you can turn the tiniest of dingy bathrooms into a beautiful place to relax.

Here’s a few tips that helped us improve our bathroom’s look by a significant amount.

Storage and Containers

You never see a plush, expensive bathroom full of clutter. So the first step is to ensure you have plenty of containers and cupboard space to put everything away when it isn’t in use. You could even go down the traditional route of keeping things in large glass jars or ceramic jugs rather than plastics – just keep them well out of the way of the kids!

A beautiful bathmat

You don’t have to spend a lot on bathmats – when they are brand new, they always look great. But let’s face it, in a busy household they tend to get pretty unkempt very quickly – and it has a serious impact on your bathroom. So, lose the Terry cloths and look for something a little more long-lasting. Persian or turkish rugs are a great substitute, and you don’t have to go too wild on size, and you will still benefit from a more sophisticated look.

Swap out your taps

I think a lot of people would love to splurge on something like a freestanding bath. But the reality for most households is that they are far too expensive to justify, and most bathrooms don’t have the room anyway. But you can make the most of your current tub by switching out the bath taps – and you can do the same for your sink, too. It makes such a difference to the style of the bathroom and is such a cheap way of getting an instant improvement.

Go big on mirrors and artwork

There are some spectacular and beautifully framed mirrors out there which you should invest in – they will give your bathroom and instant lift, no matter how dull or boring your tiles are. Look for best quality hollywood mirrors, HD Mirrors sell the best hollywood and illuminated led mirrors available on the market. You can also hang artwork or pictures – just make sure they are framed nice and tightly, so they don’t suffer from moisture leaking in. It adds a little personalisation to the bathroom, too, which, ultimately, is what separates a great bathroom from a standard one.

Improve the lighting

One final and easy fix for you is to include new lighting in your bath remodel. Try using spotlights in the bathroom, and you can even pick up chandeliers these days for a reasonable price – or create one yourself.

Set up some dimmer switches so that you can dim the lights for a nice, relaxing bath and you will enjoy your bathroom even more or simply add a yellow light fixture. Any thoughts to add? Let me know in the comments section!

If you are in Australia and is looking for bathroom renovators in Brisbane then Shane Rolfe Plumbing is one company you need to check out. With over 20 years of experience in bathroom, kitchen and laundry renovation you can’t go wrong with them.

Filed Under: promo Tagged With: artwork, bathmat, bathroom, decor, decorating, home improvements, house, interior design, lighting, mirrors, taps

How to Get the Latest Design Trends on the Cheap

August 18, 2016 by Bel

Guest Post – By Tom Brialey, owner of Action Storage.

You’ve got Pinterest boards filled with décor dreams but a bank balance that brings you back to reality. Almost everyone wants a stylish home, but unfortunately a stylish home comes with a hefty price tag meaning that most settle for magnolia walls and generic flat-packed furniture. This doesn’t have to be the case. Getting the home you dream of can be achieved with a little bit of budgeting and minor DIY skills. Trust a color theory interior specialist to craft interior palettes that resonate emotionally and visually. If you plan to remodel your kitchen space, working with a Kitchen renovation specialist helps ensure that the project is done according to your design preferences.

This article will show you how to get four of 2016’s hottest interior design trends without breaking the bank:

Industrial

image1Source/s: littlehouseoffour.com & madaboutthehouse.com

The industrial look has gained in popularity over the last few years. A mixture of raw wood and brass metallics have been brought together to create the ultimate ‘hipster’ industrial feel, which resonates with cool bars and independent coffee shops, giving a relaxed vibe.

As soon as you type ‘industrial furniture’ into any search engine or shop you will be faced with a price tag of £150+ and after two pieces you are priced out. Don’t let this shatter your industrial hipster dreams. The look (above left) can be achieved by buying modern school lockers, and a metal paint to give it a gunmetal grey look, this will cost approximately half the price of a vintage locker. If you are not the painting type, a mesh locker (above, right) may be a better option. Use the mesh locker to display cool trinkets, maybe your record collection, or just use as general storage.

Team your new locker with an inspirational quote hand painted on a canvas and the Pinterest board ‘hipster/industrial’ becomes a reality right in your own living room. Continue with additional reading here

City Skyline

image2Source/s: instagram.com/alexkatehare/ & nicestthings.com

If you are someone with itchy feet but life and various responsibilities, such as your job and bills, are stopping you from travelling, you can wake up to a view of the city (almost)  in your own bedroom.

City skylines are becoming prevalent due to the minimalist trend which is popular in 2016. Simple black outlines on blank walls have hit it big and it is really easy to achieve the look for just a couple of pounds at home.

All you will need is:

  • Pencil
  • Spirit level
  • Washi Tape
  • Picture of your chosen skyline
  • Ruler
  • Eraser

Start by carefully drawing the outline of the skyline you have chosen in pencil, use the ruler and avoid skylines with too many curves, the tape will only be able to make straight lines.

When, using your spirit level, you think you have all your lines straight, and are happy with your pencil drawing, start covering the pencil with the tape. Remember to stand back and look from a distance as you go along. Hey presto! A chic city skyline for less than £10.

Upcycling

image3
Source: diy-enthusiasts.com

A few years ago the idea of upcycling popped into a few peoples heads. Instead of buying something new, why not repurpose or refurbish something old and unloved, and so the trend was born. Often referred to as a waste product, pallets became the star of the show when a few clever busy bodies decided to create all kinds of furniture out of them.

Those without the imagination, or necessary DIY skills, lusted after these items and suddenly there was a demand, and with demand comes the supply, at a hefty price. A pallet coffee table can go for as much as £200 online. This price for something that, once upon a time, was essentially rubbish.

Luckily, if you would like to add a piece of pallet furniture to your décor there are hundreds of FREE online DIY tutorials, either found through Pinterest or on YouTube. Ask local businesses like Spartanburg pallet suppliers if they have any pallets that they can spare or you can pay a small price for. Failing that you can spend time scouring eBay, Gumtree or Freecycle to see if people want to get rid of them but don’t fancy a trip to the tip.

Your only issue will be not having enough space in your house for all the amazing pallet furniture you will end up making.

Geometric

image4Source: susanyeleyinteriors.com/blog/  & entermyattic.com/

The geometric trend allows those who like minimalism to enjoy bursts of colour in their home. Although geometric décor is big for 2016 it is in no way a new trend, bold geometric patterns could be seen on walls, art and clothing in the 1960s.

Luckily you don’t have to be Piet Mondrian, or pay those kinds of prices, to achieve the look. All you will need is:

  • Thin masking tape or Washi tape
  • A Canvas
  • Acrylic paints
  • A paint brush
  • Pencil
  • Ruler

Section the canvas into a geometric pattern, it is best to have an image in mind to ensure you know what the finished piece will look like. You can lightly use a pencil and a ruler if you are not confident putting tape on freehand.

Paint the different parts of the canvas in different but complementing colours, if you don’t want to have white lines between the shapes you will have to wait for sections to dry before moving the tape.

When it has all dried, carefully peel the tape off and you should have a beautiful geometric work of art, perfect for the minimalist and those who rent will be pleased to know that canvases are generally quite light, this means no nasty holes in the walls as well as ensuring you get your deposit back.

There you have it, four ideas to help you make sure your house stays on trend without costing you a lot of money.

Filed Under: lifestyle Tagged With: city skyline, decorating, design, geometric, house trends, industrial, interior design, painting, upcycling, your home

Granite Adds Excellence and Elegance

June 9, 2016 by Bel

When you imagine your dream kitchen or bathroom, what do you see? There is a high chance that granite countertops and tiles make an appearance in your longed-for home. The kitchen remodeling and bathroom remodeling professionals are ready to work with you so that you can find just the right pattern and color palette for your kitchen or bathroom, along with the most ideal layout and design that will impress family and friends. Trusted Anchorage general contractors can help bring your vision to life with expert craftsmanship and personalized service. Your dream home is actually a lot closer than you might think. Your dream home is actually a lot closer than you might think.

Smooth and Seamless

When you first walk into a room and see the glisten of sunlight reflecting off of a granite countertop or tile mosaic, you imagine that you are in a royal palace or a luxurious hotel getaway. Yet believe it or not, that same feeling can be conveyed in your home or business. With a granite counter in Ottawa, those streamlined designs and expert layouts can be all yours. Granite is a wonderful choice for homeowners and business owners because the material is smooth to the touch, making it tactile and easy to work with. It will stand up to wear and tear for years to come, so you know you are getting a great investment.

Versatile and Varied

The lovely granite tiles and slabs come in a wide variety of textures, patterns, and colors so you can select just the right option for your space. Think about the mood that you want to convey in your bathroom or kitchen. What are you looking for? Soft neutral tones, or something more dark and striking? Whether you want a touch of elegance on your kitchen backsplash, or you are in the market for an entire new set of granite countertops, then make your desires known and the experts will work with you to bring the vision to life.

Scores of Satisfied Customers

Both businesses and residences alike can benefit from a granite countertop or lovely tile mosaic, when working in a remodel project, consider getting help from this spreaderbar hire service. In restaurants, the backsplashes and tiled walls provide an inviting atmosphere for clients as well as a lovely work environment for cooks and employees behind the scenes.

It all adds up to create an award-winning ambiance that will have diners coming back for more. In homes, the regal simplicity of a granite countertop or cabinet refacing is a wonderful way to elevate the market value and desirability of your living space. Check our remodeling gallery to get more great ideas.

Filed Under: promo Tagged With: bathroom, granite, home decor, interior design, kitchen, tiling

Look at my house – First Floor

May 17, 2016 by Bel

It occurred to me yesterday that I never finished posting about the updates to our house! My last post, about the attic, was several weeks ago and I still have the first floor and ground floor to recap on! So let’s start with the girls room.

18107_10151349226633384_1449557902_n 189815_10151349226578384_270172043_n
When we first moved in, the girls room was the spare room where all Chris’ friends crashed when they stayed. However for a few months it had also been my brother’s bedroom. On us moving in and completing the attic, my brother moved to the attic and the girls took the spare room. Of course we needed to make it feel homely for them and before we even moved them in, Chris and I decorated their room pink!

1016435_10151802883748384_436763717_n

This was almost 3 years ago and obviously in our house make-over, we were trying to make the house more sellable. Because of this we painted the girls room, cream, though honestly with how much pink accessories there are in there, you probably can’t tell much difference!

girlsroom girlsroom2
To be honest, if we were planning to stay here longer, the girls could do with getting some different furniture and Megan could do with an office work desk as she will be getting a lot of homework from September. I was tempted to buy one of those bunk beds that has a double on the bottom and a single on the top too, but since the girls would like separate rooms when we move, I don’t want to make any big purchases yet.

Next up is our room. This has been a really gradual process…

1459350_10152872063893384_9152832555594882397_n 10502143_10153422286248384_1911264715211494358_n
When I first moved in with Chris, he had a futon bed and his large wardrobe on one side of the room. We ditched the bed and swapped the wardrobe to the opposite wall, but otherwise didn’t do much. I’ve tried to improve the room in little ways, with nice bedding and even a superhero wall mural at one point. However the biggest and best improvement was when we decided to redecorate and paint the walls magnolia.

12522986_10153896046813384_1180299925197334102_n

I realised that I don’t have a great picture of the room now, only one that was taken at night. Instead of dreadful pink curtains, we now have nice black ones. We bought a headboard and of course some nice new bedding too. We even moved the room around a little, but up some shelves and now my cuddlies have room!

Filed Under: about me, promo Tagged With: attic, bedroom, bunk bed, decor, decorating, diy, girls room, house improvements, interior design, look at my house, office desk, painting

Look at my house – The Attic

April 21, 2016 by Bel

As promised, I wanted to share with you the changes in my house since moving in a few years ago, right up till today, Majority of the work took place either immediately when we moved in, or last month when we had a major DIY project.

The attic room was the first we tackled and I just realised that I don’t really have any picture of it finished. However tackling that room was a nightmare – from stripping the walls, to learning how to wallpaper and of course the slanted ceiling making everything that bit more fun!

IMG_6770

I actually don’t remember what the room looked like when we first started. I do remember it was wallpapered but a lot of the paper was ripped and messy. We decided to remove the paper and paint the walls. However the paper was an absolute brute to get off and underneath were black walls. Sadly, the condition of the wall underneath was no longer good due to cracks, so we decided to have drywall repair done first and use wallpaper again rather than paint. Neither of us had wallpapered before and I think if we have the choice, neither of us will choose to do so again. Once the wall was papered, we decided it was just TOO white, so we painted it sky blue.

Painting the room sky blue was a game-changer. The color instantly brought a sense of calm and openness to the space, making it feel larger and more inviting. However, our adventure with house painting didn’t stop there. We soon realized that painting, although labor-intensive, allowed for a level of customization and creativity that wallpaper just couldn’t match.

Inspired by the transformation in the living room, we decided to tackle the rest of the house. Each room had its own unique challenges and required careful consideration of color and technique. For the bedroom, we chose a soft lavender to create a tranquil retreat. The kitchen received a cheerful, sunny yellow, which made it feel warm and welcoming. The hallway was painted a neutral beige to tie all the rooms together seamlessly.

11425408_10153423682143384_7301757541269942982_n

This picture is the only one I can really find that shows the decorated room and it’s actually from when Chris and I decorated our own room and had to sleep upstairs! Of course as well as sorting out the walls, placing decorations like Scotland flags, we also glossed, bought new curtains and a matching duvet colour and Chris also moved his computer up there (it was originally in the dining room).

Recently, during our big DIY spree, we sorted out the stairs from the attic room. Instead of changing the carpeting we decided to hire experts like carpet cleaning chattanooga to leave it as new, and we also painted the stair walls on the way down, the same blue as the room.

1930173_10154046547828384_3366955612291055831_n Photo 21-04-2016, 11 46 33

This was our attic done! See the next post, for the next floor down!

Save

Filed Under: about me Tagged With: attic, decor, decorating, diy, house, interior design, look at my house, moving, painting

DIY Disasters

April 1, 2016 by Bel

To be perfectly honest, until this last week, our house has pretty much been one big DIY DISASTER! I met my current partner about three and a half years ago and since me and the girls lived in a rented house and he owned his own, we all decided to move into his house. To say it was a wreck, is really an understatement. He’d bought it as a project house but sadly hadn’t really gotten very far. He was also a guy, living alone – so without being too sexist, it didn’t have much interior design!

IMG_6766 189815_10151349226578384_270172043_nIMG_7231
Before moving in, we tackled the loft, the spare bedroom and the lounge. The loft was really just an easy place to start and we took it from the horrible black you can see in the picture, to wallpapered white, to pale blue. This was the first time Chris or I had wallpapered and it was definitely an experience!

Next was the green room – which we turned pink. It was the first time ever that we’d lived in a house that was owned, so giving the girls a pink room was really their dream. I wanted them to feel at home in this house which definitely wasn’t homely and I wanted them to feel comfortable with my new partner. When we finished it was pretty good, though I did make a bit of a disaster by slitting the carpet in a fairly obvious spot! To clean it, I used any all these 15 different chemicals to treat a large variety of stains.


1016435_10151802883748384_436763717_n

In association with HMC Furniture UK I was asked to share my biggest DIY Disaster and in the spirit of April Fool’s Day, this seemed like a great idea! Until this house, my biggest faux pas when it came to DIY, was probably some shelves that I once put up (they were in a cellar and were meant to house alcohol). Sadly they came down within a few weeks and when they did there was a lot of broken glass and wasted liquid! However since living here, I can honestly say its been disaster after disaster!

If I had to sum it up to just one though, it would definitely be decorating the lounge. As you probably saw above, our lounge used to be red. Chris had his TV on the wall, dark black curtains and it just wasn’t my style at all. Instead we painted the walls a sort of stone colour, took down the tv, lessened the black and brought splashes of the red in with curtains and cushions. I was pretty pleased with the finished room. However the process of getting there was definitely interesting.

IMG_7233 IMG_7236
This was pretty much before we started…

IMG_7243 IMG_7246
There were some areas with loose plaster – in one corner and just behind the sofa. No biggie right?

IMG_7257 IMG_7256 IMG_7255 IMG_7254
Until the plaster started falling off everywhere!

Luckily, Chris was pretty handy with the plaster, but what a disaster!

IMG_7293

And don’t even get me started on the kitchen… or our bedroom ceiling. I can’t even tell you how many issues we’ve had! However as you know, this last two weeks we’ve been working on getting all our DIY up to scratch! I can’t wait to share it with you next week!

Filed Under: about me, promo Tagged With: decorating, diy, diy disasters, glossing, home improvements, interior design, moving house, our house, painting, plastering

How to Makeover Your Daughter’s Bedroom

September 16, 2015 by Bel

This post is contributed by Alex.

Doing a makeover of your daughter’s bedroom can be a big task to undertake. Here are some key tips to help you make a success of it, get more ideas at https://www.tvbedstore.co.uk/.

Choose An Interesting Bed

The most important part of any bedroom is, of course, the bed. Without a great bed, it’s impossible to create a great design for your daughter’s bedroom. It’s as simple as that! But there are lots of different options for you to consider. You could create your own if you like DIY. If not, there are loads of creative options out there.

Loads of great websites provide cabin beds for girls and boys. Some of the best ones aren’t gender specific, so don’t constrain yourself to the stereotypical, pink options. For example, you can buy beds that are designed so that they look like teepees. Or you could get a bed with loads of incorporated storage if the room is small.

Create a Homework Space

As your daughter grows up, it’s important to have a space where they can work as well as have fun. If you ask me, creating a special place in the room where they can do homework or just read for the fun of it is essential. This encourages them to take their work seriously and gives them the opportunity to do so.

You can create the space by moving away distractions in one corner of the room. It’s a good idea to install plantation shutters Newcastle on the window. This allows for the room to retain warmth better, making it more comfortable during winter. You will need to buy a good desk with some pull-out drawers, a chair, and a lamp so that they can see what they’re doing clearly.

And a Play Space

Your daughter’s bedroom can’t be all about work. There has to be the opportunity to have fun as well. So, why not create a space that’s dedicated to something they love and have fun doing in a different part of the room? You should make this separate from their homework and study space though.

The fun space could incorporate whatever your daughter enjoys doing. You should talk to them about what they want to have included in it. They’ll be sure to give you some ideas and tell you want they want most. Bedrooms become increasingly important as your daughter grows up, so it needs to be somewhere that reflects her personality.

Make it Bright and Fun

One of the things that a child’s bedroom has to be is fun. Your children should be able to enjoy their childhood while they’re still young. So, don’t make them grow up too quickly by forcing adult bedroom designs on them. It’s not about creating the kind of bedroom you like, but the kind of bedroom your daughter likes.

You also need to make sure that it’s bright and refreshing. You should open up the space and paint the walls in a bright colour so that the room doesn’t feel too dark or oppressive. And make sure you have enough light. Mirrors can help reflect the light too, so use one opposite the source of natural light in the room.

Filed Under: promo Tagged With: bedroom, beds, decorating, diy, homework, house stuff, interior design, kids bedroom, play space

Week 25 – Monday Round-up

June 22, 2015 by Bel

Last week I was late with this particular post and this week is no different either! Where Monday and Tuesday of last week were spent catching up on the decorating from over the weekend, this week has been spent catching up on catching up!

Monday I spent pretty much the whole day with Nat, after dropping the kids off at school. It was her youngest son Harry’s 2nd birthday and my gift to him was a mattress (a bed, a stairgate and a bedside…). Strange gift I know but basically Nat was wanting to move him into a big bed so I headed over there with a divan bed for Josh (her oldest son), which after we took the cot apart and put in the loft (oh I took a ladder too but that wasn’t for them to keep!) we moved Josh’s bed to Harry’s room, put the new mattress on it and then put the divan in Josh’s room. We put new bedding on Harry’s bed, added the bedside and also put up a stairgate. Afterwards Nat and I went to the tip and then Asda Living for a fitted sheet, all before I headed back to get the kids from school. The evening was spent trying to relax, even though there was still decorating to do. We did watch the Game of Thrones finale however *sob sob*.

On Tuesday Chris was off work so we made an effort to get our bedroom a bit straighter. We hoovered and tidied, moved furniture and most importantly put up a curtain rail so we could hang curtains and sleep back in there that night. We also wandered into town for a few hours to buy shelves and new curtains. We spent the afternoon finishing everything off and finally moving back into our room. It isn’t finished sadly (even now as I write this a week on) but it’s getting there slowly. I have had a lot to do since last Tuesday though so I haven’t done anything further on it.

IMG_2013

In the evening we moved the wardrobe forward (which is so heavy we had to empty it all out first) so I could paint the last wall. Since it was so heavy and all the stuff out of it made such a mess (and I didn’t want to put it back in, only to take it out again), I spent the whole evening giving the wall five coats of paint, one every half an hour. Chris and I then moved the wardrobe back, had a sort through our clothes and then crawled into bed!

On Wednesday I had a catch up blog day. I was so behind on posts I was supposed to write that it took me all day to catch up and I still wasn’t done. However I did manage to write about five for my own blog and two for TTM. Thursday started off with a breakfast from Morrisons as I offered to give Chris a lift to work and he treated me. When I got back home though I properly cracked on with a murder mystery I’ve been writing – a sort of gift for my friend’s birthday at the end of this current week. I made some progress but it all seemed very slow. I also accidentally loaded $100 into my Fiverr account which was a slap on the forehead moment. I worked all day and into the evening on the Murder Mystery but didn’t get all that far.

Friday was another day working on the Murder Mystery but it ended up more of a blog/internet day. I still felt so behind on everything I needed to do so I spent most of my time getting organised, but the evening spent on the murder mystery again. After that, my whole weekend was swallowed by the murder mystery and I’m not even kidding. I spent all day Saturday and all day Sunday, breaking only briefly to make tea, feed the kids, put some washing on etc. It genuinely felt like I was getting somewhere the whole time but in the same token it seemed like I had loads left to do.

In the end I could feel myself getting annoyed and snappy so I took Sunday evening off. I watched some TV and then decided to turn that off even and read a book. I read two short stories and then started on the second book in a series I’ve been reading and enjoying. I will write a review shortly of the first book – Sanctum (Guards of the Shadowlands, #1).

Other than that, I won’t get into my Monday and Tuesday so far but needless to say they’ve been busy again. Right now I have emails to go through and some housey bits to get done, but I’m hoping to actually see my sewing machine this evening – fingers crossed!

Filed Under: Monday Round-up Tagged With: bedding, books, british, creative writing, curtains, decor, decorating, diy, Furniture, game of thrones, GoT, interior design, painting, politics, reading, Sanctum, Sarah Fine, shelves

Guest Post: Top Tips on Buying a Cheap Bed Frame Online

June 16, 2015 by Bel

The following tips have been provided to me by the mattress bloggers at www.cutpricemattresses.co.uk for helping you buy beds online.  They will help you to get it right the first time!

If you are in the market for a new bed frame, don’t make some of the silly mistakes that I made. Not only did I choose the wrong bed size, it was not a good fit for the room and I wound up having to pay to ship it back and reorder the right one. When you are ordering a bed frame online, you want to be certain you get it right the first time so that you don’t have to deal with the hassle and cost of returning it.

What Room is Your Bed Frame Going?

Consider the room that the bed frame will be placed. If your bedroom, you want a piece that will become the focal point of the room. If for a guest room, you can opt for a less fancy style. For my master bedroom I chose a bed frame that created a calming environment. Keep in mind the room the bed frame will be so you can price accordingly.

frozen-inspired-princess-castle-bed-2125-p

Do You Have Enough Space?

Maybe you are like me, and you just bought a new mattress and need to get the bed frame to match. Problem for me was I purchased a frame for a queen mattress when we had just upgraded to a king. Slipped my mind, but this was a costly mistake. Be sure that you know exactly the size mattress you have that you need the frame for before pressing that order button.

Have a Budget in Mind?

The bed frames can range from cheap and inexpensive to extremely costly. The fancier design you fall in love with, the more expensive this purchase is going to be. Be sure to have a solid budget in mind, then shop within that budget to avoid going overboard and spending more than you had anticipated.

Is the Bed Frame Movable?

One thing that I completely overlooked when I bought my bed frame was how movable is the piece. Many of the larger bed frames will not disassemble into small pieces, so you had better be sure to measure doors and hallways to ensure it can make it to the room without incident. If your home is on the small size, consider a bed frame that has the ability to be taken apart. Consider a bed frame that has casters, this will make it much more easier to roll it around the room if you ever have to make decorative changes.

—————-

As you know we have recently decorated our bedroom. Though we haven’t bought a new bed, we have needed to purchase a variety of other items. Living in Gainsborough and needing the items quicker than buying them online, we were fairly limited. However we sourced curtains from Argos, shelves from B&Q and new bedding from B&M Home. I can’t wait to share my new look bedroom with you soon!

Filed Under: promo Tagged With: bedding, bedroom, beds, curtains, decorating, home improvements, interior design, shelves

Hi, my name is Bel!


I’m a forty something, mother of two, self-confessed geek!

Here on my blog you’ll find;
books I’ve read, clothes I’ve made, movies I’ve watched, cakes I’ve baked, products I’ve tried, places I’ve been, pictures I’ve taken… plus lots and lots of DISNEY!!

I’m a lifestyle blogger – covering a little of everything I love <3

Follow Me

Follow

2022 Reading Challenge

2022 Reading Challenge
Bel has read 0 books toward her goal of 12 books.
hide
0 of 12 (0%)
view books

Search Me

Blog Archive

Copyright © 2025 · Arabella on Genesis Framework · WordPress · Log in